In-Person Payments
BETA. In-person payments (terminals) are in beta and not yet available in production. These endpoints work in the demo/sandbox environment only; calling them in production returns 501 Not Implemented. Contact Jetpay support for early access.
Take a card-present payment on a physical terminal and get the outcome in a single request.
Use this flow for in-person payments at a point of sale, counter, or kiosk, where the cardholder taps, inserts, or swipes their card on a terminal that Jetpay manages for you. You send a synchronous payment request to a terminal by its ID, Jetpay holds the request open while the cardholder pays, and the result comes back in the response.
To charge a stored card without a physical device, use the Collect payment method at checkoutDirectly charge a credit card flow instead.
Before you integrate
You will receive a physical terminal provisioned for your account before you start. Jetpay performs the terminal setup for you, so little to no configuration is required on your side to begin.
Network setup
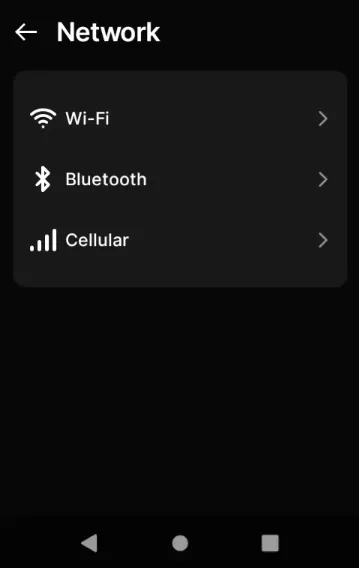
Your terminal may come with a SIM card for mobile data. If it does, it works out of the box, and WiFi setup is only needed if you would rather not rely on mobile data. To connect over WiFi, open Settings, tap Network (this is passcode protected), enter the terminal passcode, then choose Wi-Fi. If you do not know your terminal passcode, please contact Jetpay support.

Connection strength matters: on a weak signal or with network anomalies, requests can be slow to reach the terminal, time out, or fail to reach the terminal at all.
Kiosk mode
Holding down on the spinner while the terminal starts up toggles kiosk mode on some devices, which controls the visibility of the settings button. If this does not work on your device, contact Jetpay support and we can make the change for you.
Further customization
If you would like terminal customization that we do not currently offer programmatically (for example, changing the terminal background), contact Jetpay support and we can arrange it for you.
Test cards
Use the test cards provided for the sandbox environment.
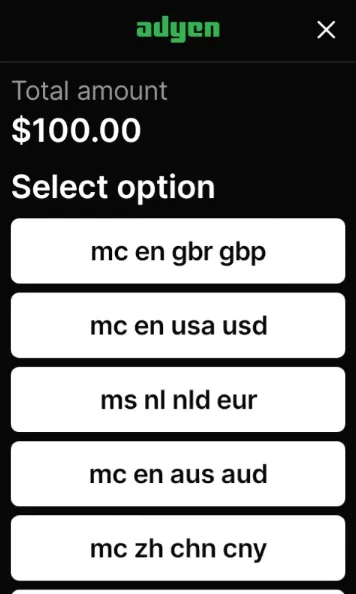
Each test card carries multiple "applications" (different currencies and other details). To change which application is used, insert the card during a payment request: the terminal then displays a list of applications to choose from.
Unless Dynamic Currency Conversion (DCC; disabled by default) is enabled, the current 'application' on a test card will have no effect on the terminal's payment request. As such, if you encounter this screen, any 'application' you select for your card will be inconsequential. At this time, the available test cards do not offer any CAD applications (though this should not impact the implementation or testing of your integration).
If you would like to enable DCC for your terminal, store, or company, please contact Jetpay support.
To trigger simulated failures, request specific amounts.
Updating terminal configuration
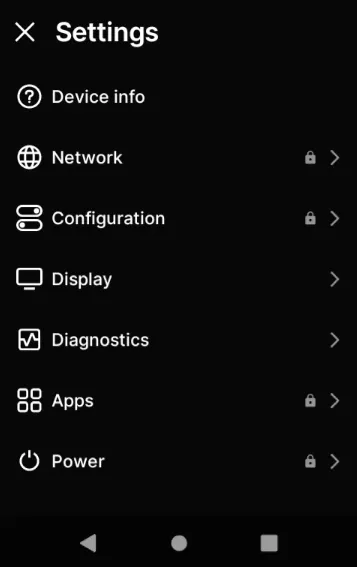
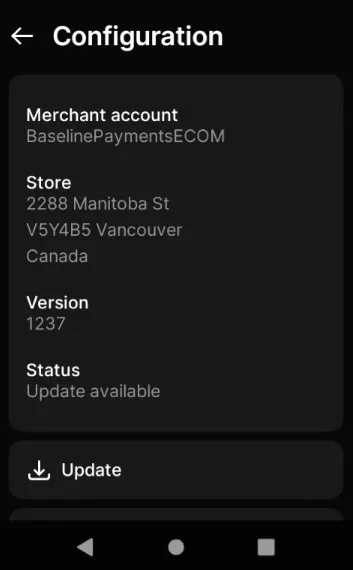
Terminal configuration refreshes periodically. If we make a configuration change for you and you want to confirm it has taken effect immediately, run a configuration update check on the terminal. You can see the current state under Settings > Configuration, where Status shows whether an update is available.
Prerequisites
- Getting your API KeyJetpay API Key
- At least one terminal provisioned to your account, belonging to a store
- A payout account configured on that terminal (funds are deposited here)
Terminals and stores are provisioned by Jetpay. Before you charge, the terminal must exist and have a payout account; otherwise the request fails with a 409 payoutAccountMissing error. Use List your terminals to see which terminals you can access and whether each has a payout account.
The terminal endpoints live on their own API reference page. Browse them at /docs/terminals rather than the main /docs reference.
Flow Overview
In the synchronous flow, your backend makes one request and waits for the terminal to return a result.
sequenceDiagram
    autonumber
    participant Platform
    participant Jetpay
    participant Terminal
    participant Cardholder

    Platform->>Jetpay: POST /terminals/{terminalId}/payment-request (Prefer: respond-sync)
    Jetpay->>Terminal: Prompt for payment
    Cardholder->>Terminal: Tap, insert, or swipe card
    Terminal-->>Jetpay: Transaction result
    Jetpay-->>Platform: 200 OK (transaction result)
Implementation details
List your terminals
Endpoint: GET /terminals
Returns every terminal you can access, with its store and payout account. You will only need to call this to look up the JetPay UUID of each terminal: you do not need to call it before every payment.
curl https://extapi.demo.jetpay.baselinepayments.com/terminals \
  -X GET \
  -H "Authorization: Bearer <YOUR_API_TOKEN>"
A successful call returns HTTP 200 with a list of terminals:
[
  {
    "poi_id": "P400Plus-123456789",
    "identifier": "b3f1c2d4-5e6f-7a8b-9c0d-1e2f3a4b5c6d",
    "effective_payout_account": "9f8e7d6c-5b4a-3210-fedc-ba9876543210",
    "store": {
      "identifier": "a1b2c3d4-5e6f-7a8b-9c0d-1e2f3a4b5c6d",
      "name": "Downtown Store",
      "address": "123 Main St, Toronto, ON"
    }
  }
]
Use the terminal's identifier (a UUID) as the terminalId path parameter in the requests below. If effective_payout_account is null, contact Jetpay support to configure one before you charge.
Request a payment on the terminal
Endpoint: POST /terminals/{terminalId}/payment-request
Send the amount to collect to a specific terminal. Synchronous is the default: unless you set the Prefer header to respond-async (not covered by this guide), Jetpay waits for the terminal and returns the result in the response. You can send Prefer: respond-sync explicitly to be unambiguous.
At minimum, provide the amount under paymentTransaction.amountsReq.requestedAmount. You can optionally shape the terminal prompt with transactionConditions (allowed card brands, preferred debit, display language, forced entry mode) and attach your own reference with saleData.saleReferenceId, which is echoed back in the result. See the endpoint reference for the full request and header specification.
The allowedPaymentBrand field may only be used when two or more brands are specified. The following values are supported: visa, mc, amex, maestro, diners, discover, jcb, cup, and interac_card.
Note that the acceptance of a valid value does not guarantee that your account is configured to support the corresponding payment method. If you are uncertain which payment methods your account supports, or if a desired payment method is not in the list above, please contact Jetpay support.
Most merchants will want to supply their merchant category code (MCC) in transactionConditions.merchantCategoryCode. It is optional, but recommended so the transaction is categorized correctly. If you do not know your MCC, contact Jetpay support.
To prompt the cardholder for a tip, include a gratuity object in the body. See Collect a tip (gratuity).
Once you send the request, the terminal prompts the cardholder for the amount.
Idempotency
Include a unique Idempotency-Key header (such as a UUID) so the request can be safely retried without charging the cardholder twice. If a retry uses the same key, body, and headers, Jetpay returns the outcome of the original request rather than starting a new payment. Reusing a key with a different body returns an error. The exact retry behaviour for each transaction state is documented on the endpoint reference.
A synchronous request can run for a while: the payment can be "advanced" at the terminal (for example, inserting a card then being prompted for a PIN), and each step extends the payment's lifetime. A request is capped at 150 seconds. This endpoint allows up to 190 seconds for network delay and Jetpay processing, so set your client's request timeout above 190 seconds, or it may be cut off before the terminal responds.
If a terminal has recently powered off, or powers off mid-request, the request will almost always time out. The payment provider does not check the terminal's status in real time, so the 'terminal unavailable' result will not immediately be returned to you in these cases.
curl https://extapi.demo.jetpay.baselinepayments.com/terminals/b3f1c2d4-5e6f-7a8b-9c0d-1e2f3a4b5c6d/payment-request \
  --max-time 200 \
  -X POST \
  -H "Authorization: Bearer <YOUR_API_TOKEN>" \
  -H "Content-Type: application/json" \
  -H "Prefer: respond-sync" \
  -H "Idempotency-Key: 7c9e6679-7425-40de-944b-e07fc1f90ae7" \
  -d '{
    "saleData": {
      "saleReferenceId": "order_1042"
    },
    "paymentTransaction": {
      "amountsReq": {
        "requestedAmount": 10.00
      }
    }
  }'
Handle the response
When the payment concludes, the endpoint returns HTTP 200 with the full transaction result (IPPTransactionResult). The example below is abbreviated: response.additionalResponse is a large map of provider-specific key/value pairs, and paymentReceipt holds the full printable receipt content (typically both a cashierReceipt and a customerReceipt, each with many outputText lines). Sensitive values such as the terminal ID are redacted here for the purpose of this guide, but will be available in the real response.
{
  "identifier": "33d57982-3f64-416b-acb8-07652a8edca8",
  "response": {
    "result": "success",
    "additionalResponse": {
      "acquirerResponseCode": "APPROVED",
      "cardScheme": "mc",
      "cardSummary": "9999",
      "fundingSource": "CREDIT",
      "posAuthAmountCurrency": "CAD",
      "posAuthAmountValue": "10000",
      "posEntryMode": "CLESS_CHIP",
      "pspReference": "<redacted>",
      "tid": "<redacted>"
    }
  },
  "saleData": {
    "saleReferenceId": "order_1042"
  },
  "paymentResult": {
    "paymentInstrumentData": {
      "paymentInstrumentType": "card",
      "cardData": {
        "paymentBrand": "mc",
        "maskedPan": "541333 **** 9999",
        "entryMode": ["contactless"],
        "cardCountryCode": "826"
      }
    }
  },
  "paymentReceipt": [
    {
      "documentQualifier": "cashierReceipt",
      "requiredSignatureFlag": false,
      "outputContent": {
        "outputFormat": "text",
        "outputText": [
          { "text": { "name": "TOTAL", "value": "CAD 100.00", "key": "totalAmount" }, "characterStyle": "bold", "endOfLineFlag": true },
          { "text": { "name": "APPROVED", "key": "approved" }, "characterStyle": "bold", "endOfLineFlag": true }
        ]
      }
    }
  ]
}
The HTTP status reflects whether Jetpay processed the payment request, not whether the card was charged. A 200 means the transaction reached a conclusion. Always inspect response.result for the actual payment outcome.
- Check response.result for the outcome, success or failure. On failure, response.errorCondition explains why (see Errors).
- On success, paymentResult carries the card details and paymentReceipt (when present) carries printable receipt content.
Collect a tip (gratuity)
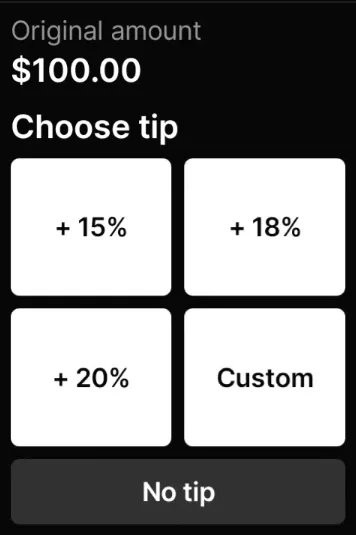
To prompt the cardholder for a tip on the terminal, include a gratuity object in the payment request body. When gratuity.enabled is true, the terminal shows a tip screen before the payment concludes and adds the chosen tip to the amount charged. Omit gratuity, or set enabled to false, and no tip prompt is shown.
Enable tipping with the default options (15%, 18%, and 20%, plus a "custom" button for the cardholder to enter their own amount):
{
  "paymentTransaction": {
    "amountsReq": { "requestedAmount": 10.00 }
  },
  "gratuity": {
    "enabled": true
  }
}
To present your own options, supply gratuity.options. Each option is a percentage (for example, 15 for 15%), a fixed amount, or a custom button that lets the cardholder type any amount:
{
  "paymentTransaction": {
    "amountsReq": { "requestedAmount": 10.00 }
  },
  "gratuity": {
    "enabled": true,
    "options": [
      { "type": "percentage", "value": 15 },
      { "type": "percentage", "value": 18 },
      { "type": "percentage", "value": 20 },
      { "type": "custom" }
    ]
  }
}
A few rules shape how the prompt renders (see the endpoint reference for the exact constraints):
- Numerical options must be all percentage or all fixed. You cannot mix the two in one prompt.
- You can supply up to three numerical options plus at most one custom option, for four in total.
- Options are laid out in order, left to right across two rows. The custom button, when present, is always shown last.
When the cardholder adds a tip, it comes back on the completed payment under paymentResult.amountsResp.tipAmount, in major currency units:
{
  "paymentResult": {
    "amountsResp": {
      "tipAmount": 2.00
    }
  }
}
If a tip option could push the transaction total above your company's IPP transaction limit, the request is rejected up front with a 422 gratuityExceedsTransactionLimit error. Keep your fixed and percentage options within that limit for the amounts you charge.
If the request runs long (303)
A payment request can exceed the 150-second cap when the payment is advanced at the terminal (for example, a card is inserted and the terminal prompts for a PIN, extending the payment's lifetime). When that happens, the endpoint responds with HTTP 303 See Other instead of 200. The body is an acknowledgement containing the transaction identifier, and the Location header points at the status endpoint to poll:
Location: /payment-requests/status?transactionId=d4e5f6a7-8b9c-0d1e-2f3a-4b5c6d7e8f90Poll that endpoint (see Check payment status) until the transaction reaches a conclusion.
Some HTTP clients follow 303 redirects automatically, issuing a GET to the Location and discarding the original response body. If desired, disable automatic redirect following for this request so you can read the 303 response body and Location header yourself.
Check payment status
Fetch the status of a payment request at any time. This is how you resolve the 303 case, and it is also your general fallback: if anything interrupts the original request (an unexpected error, a dropped or interrupted connection, a client timeout), use it to recover the transaction's outcome.
By transaction ID or idempotency key (recommended): GET /payment-requests/status with a query parameter, exactly one of transactionId or idempotencyKey. Both are things you already have: transactionId is the identifier returned by the request, and idempotencyKey is the key you sent (useful when the request never returned an identifier).
Latest request on a terminal: GET /terminals/{terminalId}/payment-request. Returns the same result for the most recent request on the terminal, and takes no query parameters.
The examples below use the recommended endpoint. Set your client timeout to at least 40 seconds for these calls.
curl "https://extapi.demo.jetpay.baselinepayments.com/payment-requests/status?transactionId=d4e5f6a7-8b9c-0d1e-2f3a-4b5c6d7e8f90" \
  --max-time 40 \
  -X GET \
  -H "Authorization: Bearer <YOUR_API_TOKEN>"
The response is the same IPPTransactionResult shown above. A 404 means no payment request exists for the identifier you provided.
The "latest request on a terminal" endpoint tracks payment requests from the last 48 hours only, and the "most recent" request may be a later failed one rather than the transaction currently on the terminal. This behaviour is inherent to the payment provider, not Jetpay. When possible, fetch by transactionId or idempotencyKey for an unambiguous result.
Abort a payment request
To cancel an in-progress payment (for example, the cardholder walks away), abort it.
By transaction ID or idempotency key (recommended): POST /payment-requests/abort with a body containing exactly one of transactionId or idempotencyKey.
Latest request on a terminal: POST /terminals/{terminalId}/payment-request/abort. Aborts the most recent request on the terminal, and takes no body.
The "latest request on a terminal" abort has the same caveat as the status endpoint, and is likewise inherent to the payment provider, not Jetpay: the most recent request may be a later failed one rather than the transaction currently on the terminal. When you know it, abort by transactionId or idempotencyKey for an unambiguous target.
The examples below use the recommended endpoint. Set your client timeout to at least 40 seconds for these calls.
curl https://extapi.demo.jetpay.baselinepayments.com/payment-requests/abort \
  --max-time 40 \
  -X POST \
  -H "Authorization: Bearer <YOUR_API_TOKEN>" \
  -H "Content-Type: application/json" \
  -d '{
    "idempotencyKey": "7c9e6679-7425-40de-944b-e07fc1f90ae7"
  }'
A successful abort returns HTTP 204 No Content.
A 204 confirms only that the abort request reached the terminal, not that a payment was aborted. Confirm the final state with a status fetch.
Testing notes and limitations
- debitPreferredFlag cannot currently be tested in the sandbox environment, because the payment provider does not offer test Canadian debit cards.
Errors
Errors use the envelope { "error": "<code>", "message": "<detail>" }. The full set of HTTP status codes and error codes for each endpoint is listed in the API reference.
One behaviour is easy to miss: when a payment completes but the card is declined, the request still returns HTTP 200. The HTTP status only tells you Jetpay processed the request; the payment outcome lives in the response body. Always branch on response.result, and read response.errorCondition (for example refusal, wrongPin, invalidCard, aborted) when it is failure.